
In wall framing, there’s one step that quietly determines the entire build quality:
👉 stud layout.
If your stud spacing is even slightly off, it affects everything — drywall alignment, load distribution, even how cabinets or fixtures mount later.
That’s why experienced builders don’t rely on tape measures alone anymore. More and more professionals are switching to framing stud layout tools to eliminate guesswork and speed up the process.
🔍 What Is a Framing Stud Layout Tool?
A framing stud layout tool is a precision positioning jig used to quickly set wall studs at consistent intervals — typically:
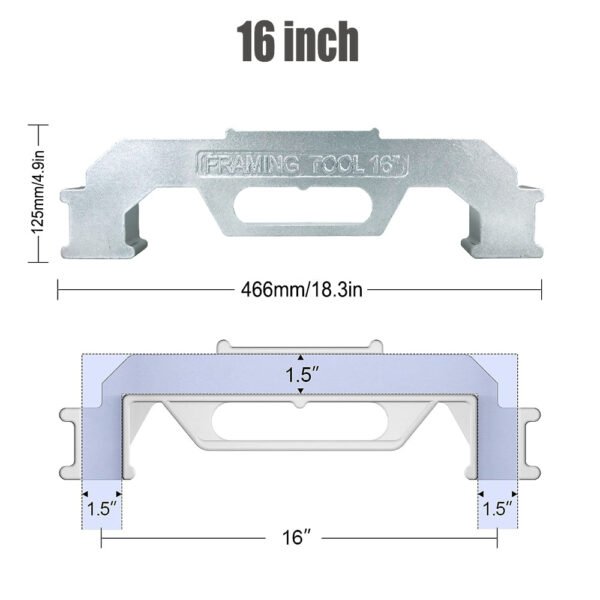
16-inch on center (OC)
24-inch on center (OC)
Instead of measuring and marking repeatedly, the tool:
✔ physically positions each stud
✔ ensures consistent spacing
✔ reduces layout errors
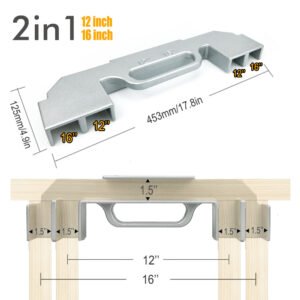
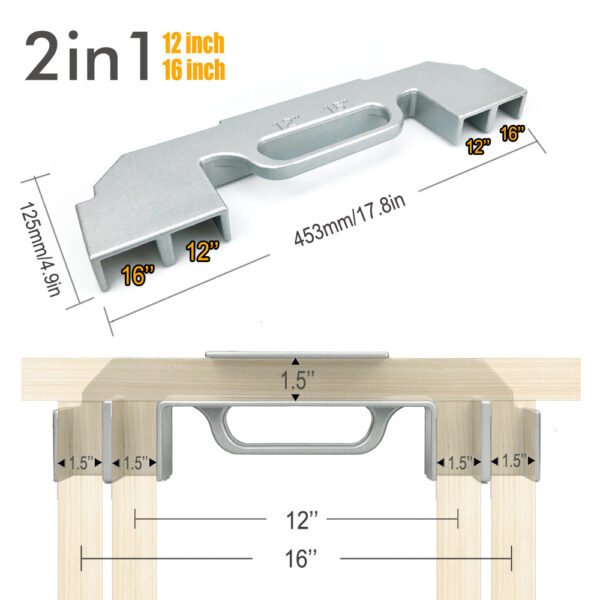
Some modern tools even allow multi-size configurations (12”, 14”, 16”, 24”), making them adaptable for different projects.
🧠 Why Stud Spacing Matters More Than You Think
Stud spacing isn’t just about looks — it directly affects structural performance.
According to framing guidelines, spacing controls:
load distribution across the wall
support for drywall and sheathing
overall wall alignment and strength
Common Standards:
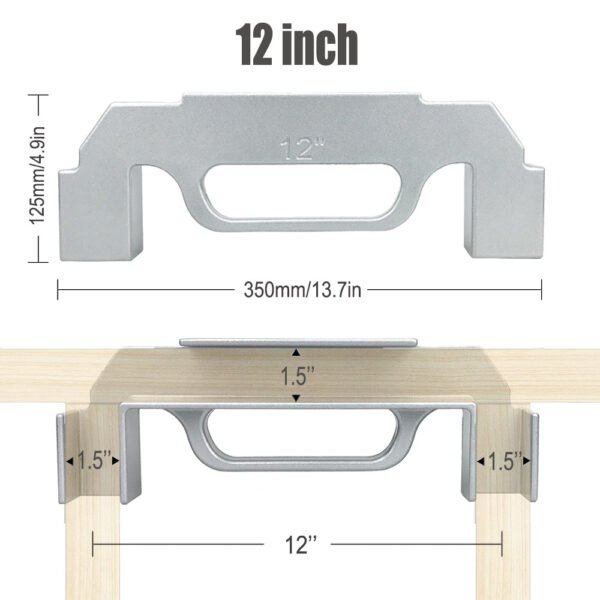
16″ OC → residential standard (strong + versatile)
24″ OC → material-saving option (lighter structures)
When spacing is inconsistent:
❌ drywall seams won’t land properly
❌ structural load becomes uneven
❌ rework increases significantly
👉 That’s why precision matters more than speed — unless you have the right tool.
⚙️ How a Stud Layout Tool Actually Improves Efficiency
Traditional method:
measure → mark → re-check → place → adjust
Tool-based method:
place tool → insert stud → fix
That’s it.
Many modern framing tools are designed so that:
studs “snap” into correct position
spacing is fixed by the tool itself
no repeated measuring is required
In real-world use, this can increase framing speed significantly while maintaining accuracy.
🔧 Key Features to Look For
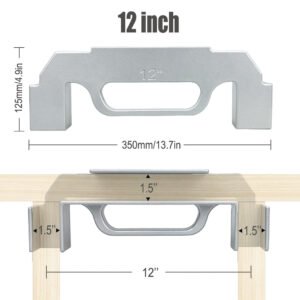
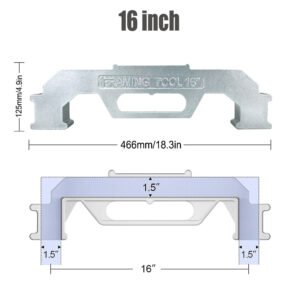
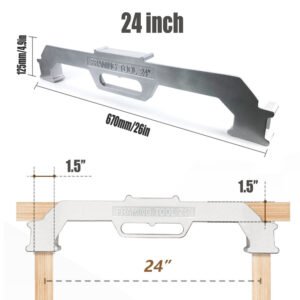
- On-Center Precision (16″/24″)
Industry-standard spacing ensures:
compatibility with drywall sheets
correct load distribution
easier finishing work
16 inch stud layout tool / 24 inch framing tool
- Adjustable Spacing Options
Some tools support:
12″ / 14″ / 16″ combinations
Ideal for:
custom builds
non-standard framing
- Durable Aluminum Construction
High-quality tools use:
cast aluminum
corrosion-resistant materials
👉 This ensures long-term durability even on job sites.
- Clamp or Slot Positioning Design
The best tools:
hold studs in place
align edges automatically
reduce movement during nailing
🛠️ Real Use Cases
Framing stud layout tools are widely used for:
wall framing layout tool for construction
diy wall framing stud spacing guide
stud spacing tool for carpentry
framing jig for wood studs
construction stud alignment tool
📐 Step-by-Step: Using a Framing Stud Layout Tool
Step 1: Align top and bottom plates
Mark or clamp both plates together
Step 2: Position the tool
Place it at the starting edge
Step 3: Insert studs into slots
The tool automatically sets spacing
Step 4: Fix studs in place
Use nail gun or screws
Step 5: Move and repeat
Continue along the wall
👉 Compared to manual layout, this method reduces cumulative error across long walls.
❓ FAQ
Q1: Do I still need a tape measure?
Yes, but much less.
The tool replaces repetitive measuring, but you still need:
initial layout reference
opening adjustments (doors/windows)
Q2: Is 16-inch spacing always required?
Not always.
16″ OC → standard residential walls
24″ OC → some non-load-bearing walls
👉 Always follow local building codes.
Q3: Can beginners use this tool?
Absolutely.
In fact, it’s easier than manual layout because:
spacing is fixed
alignment is guided
fewer mistakes happen
Q4: Does it really save time?
Yes — especially on large projects.
Instead of measuring every stud, the tool allows:
✔ repeatable placement
✔ faster workflow
✔ fewer corrections
Q5: What materials can it handle?
Most tools are compatible with:
2×4 lumber
2×6 lumber
standard framing boards
🔗 Recommended Tool
If you’re looking for a reliable solution for accurate framing, check:
👉 https://fixparthub.com/product/framing-stud-layout-tool/
This tool is designed for:
precise 16″/24″ stud spacing
fast wall framing setup
consistent alignment across projects
both professional and DIY use
🚀 Final Thoughts
In framing, consistency is everything.
You can build a wall with just a tape measure — but maintaining perfect spacing across an entire structure is where most errors happen.
A framing stud layout tool solves that problem by turning spacing into a repeatable mechanical process, not a manual guess.
If you’re doing:
wall framing
floor structures
roofing frames
then upgrading your workflow with a dedicated layout tool is one of the simplest ways to improve both speed and accuracy.
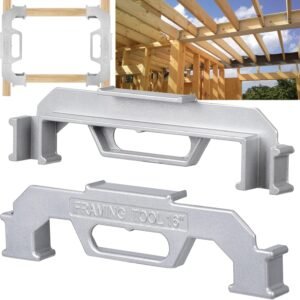


Premium Framing Stud Layout Tool | Perfect 12″/16″/24″ On-Center Jig | FixPartHub
- Eliminate Tape Measure Math: Put away your tape measure and pencil. This precision jig sets your wall studs at perfect, code-compliant on-center (O.C.) spacing every single time, drastically accelerating your framing speed and eliminating human calculation errors.
- Guarantee Flawless Drywall Alignment: A 1/4-inch framing mistake means your 4×8 drywall or OSB panels won’t land on a stud edge, forcing you to tear down and rebuild. This tool guarantees dead-center accuracy, ensuring seamless board joints and saving you from expensive material waste.
- The Solo Builder’s “Third Hand”: Framing a wall by yourself? This heavy-duty jig slides snugly over the top and bottom plates, gripping the stud squarely in place. It holds the heavy lumber perfectly vertical so you can comfortably use your framing nailer without the wood twisting or shifting.
- Indestructible Jobsite Durability: Crafted from rugged, high-impact solid cast aluminum (or heavy-gauge steel). It won’t bend, rust, or warp when tossed into the back of a truck, surviving the harshest drops and impacts on professional construction sites.
- FixPartHub Professional Standard: Upgrade your toolbelt with gear built for serious contractors. Is your pneumatic framing nailer leaking air or misfiring? Search our massive unlisted catalog for exact-fit nail gun rebuild kits, O-rings, and air compressor replacement parts!
| Buy More, Save More | Quantity | Discount |
|---|---|---|
| Bulk Discount | 2 | 5% |
| Bulk Discount | 3 – 5 | 10% |
| Bulk Discount | 6 – 19 | 15% |