
You reach for your DeWalt DCD791 drill or DCD796 hammer drill. You slide a fully charged 20V MAX battery into the base and pull the variable speed trigger.
Instead of the aggressive torque of a brushless motor, you get absolute silence. The LED work light at the base of the handle turns on—or worse, it flashes a few times—but the chuck refuses to spin. You check the battery. It’s full. You try spinning the chuck by hand; it moves freely.
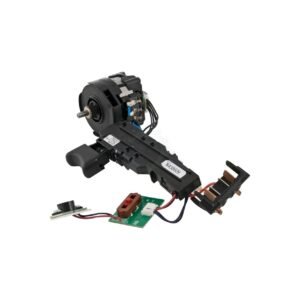
Welcome to the “Flashing LED of Death.” This highly specific symptom is the hallmark of a dead Electronic Control Module (ECM) in DeWalt’s brushless architecture. Today, we are breaking down exactly why this happens, why you can’t “just buy a $10 switch,” and how to rebuild the entire electrical system in 15 minutes using the DeWalt N438606 Motor and Switch Assembly.
The Brushless Dilemma: Why You Can’t Replace Just the Switch
In old-school brushed drills, if the tool died, you unscrewed the casing, popped in two new carbon brushes, and went back to work. If the trigger broke, you clipped two wires and swapped the switch.
The DCD791 and DCD796 are 20V MAX XR Brushless tools. They do not have carbon brushes. Instead, they rely on a complex microcomputer (the ECM) to send precise electronic pulses to the copper windings of the stator, creating a rotating magnetic field.
To protect this sensitive computer board from heavy job site vibration, extreme dust, and moisture, DeWalt engineers encase the control board in a thick block of black potting epoxy. Furthermore, the variable speed trigger, the control board, and the heavy-gauge wires leading to the motor stator are hardwired and sealed together at the factory.
If you overheat the drill and burn a single copper winding on the stator, or if a drop of water shorts out the trigger, the entire unified system fails. The switch is still sending the signal to turn the LED light on, but the fried control board cannot fire the motor.
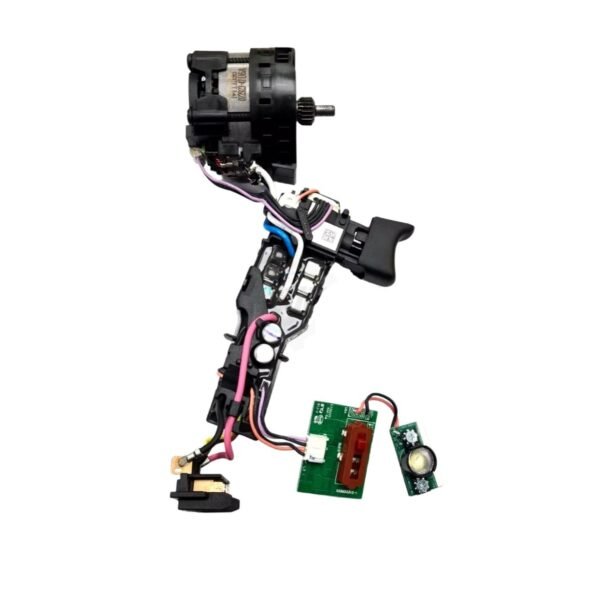
To fix the tool, you must replace the entire nervous system using the N438606 Motor and Switch Assembly.
The 15-Minute Bench Rebuild (Teardown & Installation)
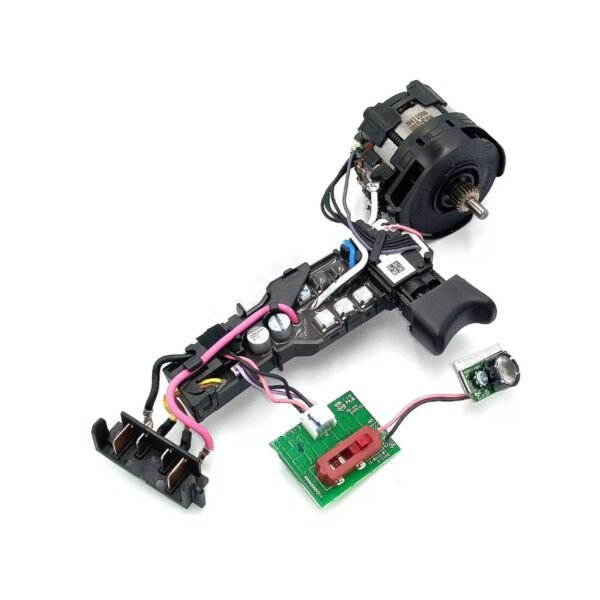
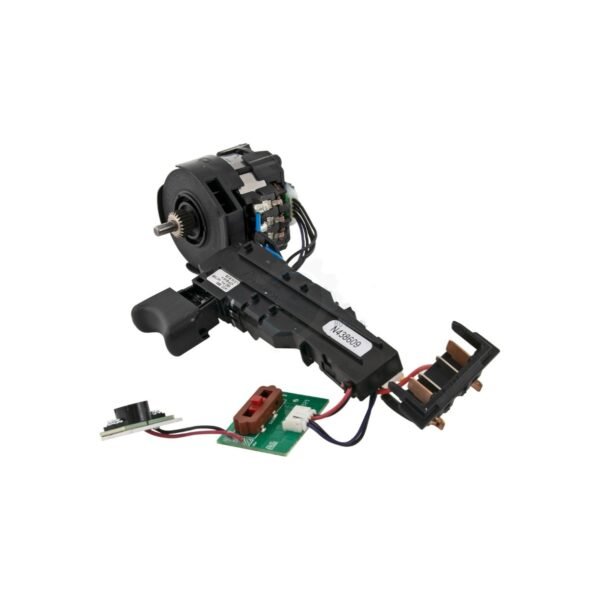
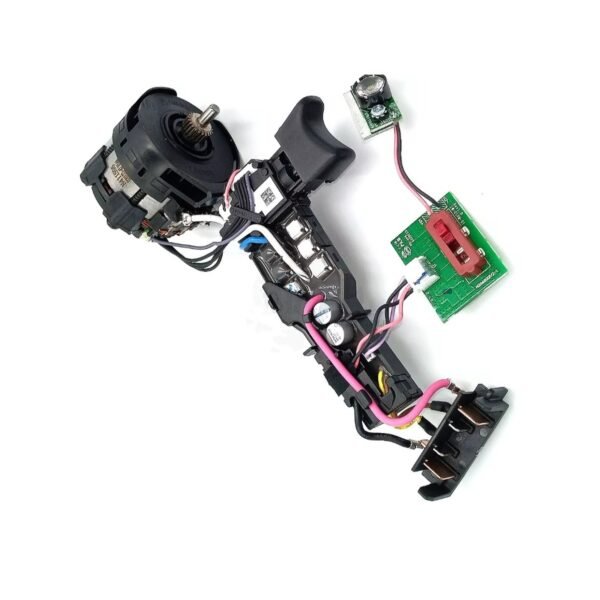
Replacing the N438606 assembly looks intimidating because of the wires, but it is actually a highly modular, plug-and-play repair. You will be reusing your original gearbox and your original magnetic rotor (the spinning center of the motor).
- The Teardown: Remove the Torx screws holding the yellow and black clamshell housing together. Carefully separate the casing.
- Lift the Guts: Lift the entire motor and transmission assembly out of the plastic shell.
- Extract the Rotor: Grab the transmission in one hand and the old, burnt stator (the copper coils) in the other. Pull them apart. The magnetic rotor will stay attached to the transmission and slide out of the stator.
- The Magnet Warning: Take your new N438606 stator and slide your original rotor into it. Watch your fingers. The neodymium magnets on the rotor are incredibly strong and will violently snap into the center of the stator. Keep your skin clear of the pinch points.
- Drop in the Brain: Place the newly mated motor and transmission back into the lower plastic housing. Seat the new trigger switch and drop the battery terminal block into the base of the handle.
- The Critical Wire Route: This is where guys mess up. You must route the thin LED light wires and the heavy power cables exactly through the plastic retention channels molded into the housing. If a wire crosses a screw post, closing the clamshell will pinch and sever the wire, instantly shorting out your brand-new $70 control board.
- Seat the Reverse Lever: Ensure the plastic forward/reverse toggle is properly seated in the notch on top of the new switch before screwing the top shell back on.
🛑 Professional Risk Management & Safety Disclaimer
Always remove the 20V Lithium-Ion battery before removing a single screw from the tool housing. Modern brushless control boards contain high-capacity capacitors that can retain a lethal electrical charge even after the battery is removed. Never probe the potted control board with metal tools. Do not apply aftermarket grease to the brushless stator or rotor, as it will attract conductive metal dust and cause an immediate short circuit. FixPartHub assumes no liability for injury or tool damage resulting from improper diagnostic or repair procedures.
Stop Throwing Away Premium Tools
A flashing LED does not mean your drill belongs in the dumpster. The mechanical gearbox, the chuck, and the housing are perfectly fine. Grab your Torx driver, perform the “brain transplant” with the OEM N438606 assembly, and get your premium XR drill back on the job site today.
🛒 Order the Genuine DeWalt N438606 Motor & Switch Assembly Here!
🤝 Monetize Your Mechanical Expertise
Are you the go-to mechanic on your job site? When a buddy’s drill starts flashing and they don’t know what to do, send them your custom link to our repair parts. Join the FixPartHub Tech Partner Program and earn a 10% cash commission on every part you help sell.
👉 Click here to grab your Affiliate Link and start earning today!


Premium Motor & Switch Assembly N438606 Compatible with DeWalt. | FixPartHub
- The “Brushless” Repair Reality: Unlike older tools, modern XR brushless drills do not have carbon brushes you can swap out. When the tool completely dies under a heavy load, the electronic control board or the stator coils have burned out. This complete modular assembly is the only guaranteed fix.
- All-in-One “Brain & Heart” Module: This is not just a switch. The N438606 is a fully integrated, pre-wired assembly that includes the variable-speed trigger switch, the epoxy-sealed electronic control module (ECM), the battery terminal block, and the heavy-duty copper stator.
- Cure the “Dead Trigger” Glitch: Does your drill’s LED work light turn on, but the motor refuses to spin? Or does the motor stutter and emit a harsh electronic burning smell? Replacing this module restores flawless communication between your battery and the drivetrain.
- Exact DCD Series Fitment: Precision-engineered replacement part. Designed specifically for the legendary 20V MAX XR Brushless compact drill/driver series. Fully compatible with the DCD791 (Type 1, 10) and the DCD796 Hammer Drill (Type 1, 10).
- FixPartHub Professional Standard: Save your premium bare tool from the landfill. Pro Tip: Because the control board is potted in epoxy, it cannot be micro-soldered or bypassed. A full modular swap is required! Did your transmission gears strip out before the motor died? Browse our catalog for premium aftermarket DCD796 gearboxes!
| Buy More, Save More | Quantity | Discount |
|---|---|---|
| Bulk Discount | 2 | 5% |
| Bulk Discount | 3 – 5 | 10% |
| Bulk Discount | 6 – 19 | 15% |