The Problem: Why Hinge Installation Is Frustrating
You’ve probably been there: you need to install new hinges on a door. You mark the hinge positions with a pencil and a square. You try to chisel out the mortise by hand. The chisel slips. You cut outside the lines. The mortise is too shallow or too deep. The hinge sits crooked. The door won’t close properly.
This is the reality for most DIYers and even some professionals. Traditional hinge mortising requires:
- A sharp chisel (and the skill to use it properly)
- A mallet
- A pencil and square for marking
- Steady hands and patience to cut a clean mortise
And after all that, the result is often an uneven, messy mortise that leaves gaps around the hinge plate.
💡 The Hard Truth: According to professional carpenters, poorly cut hinge mortises are one of the most common reasons doors don’t close properly. A bad mortise means the hinge sits crooked, the door binds, and you end up redoing the work.
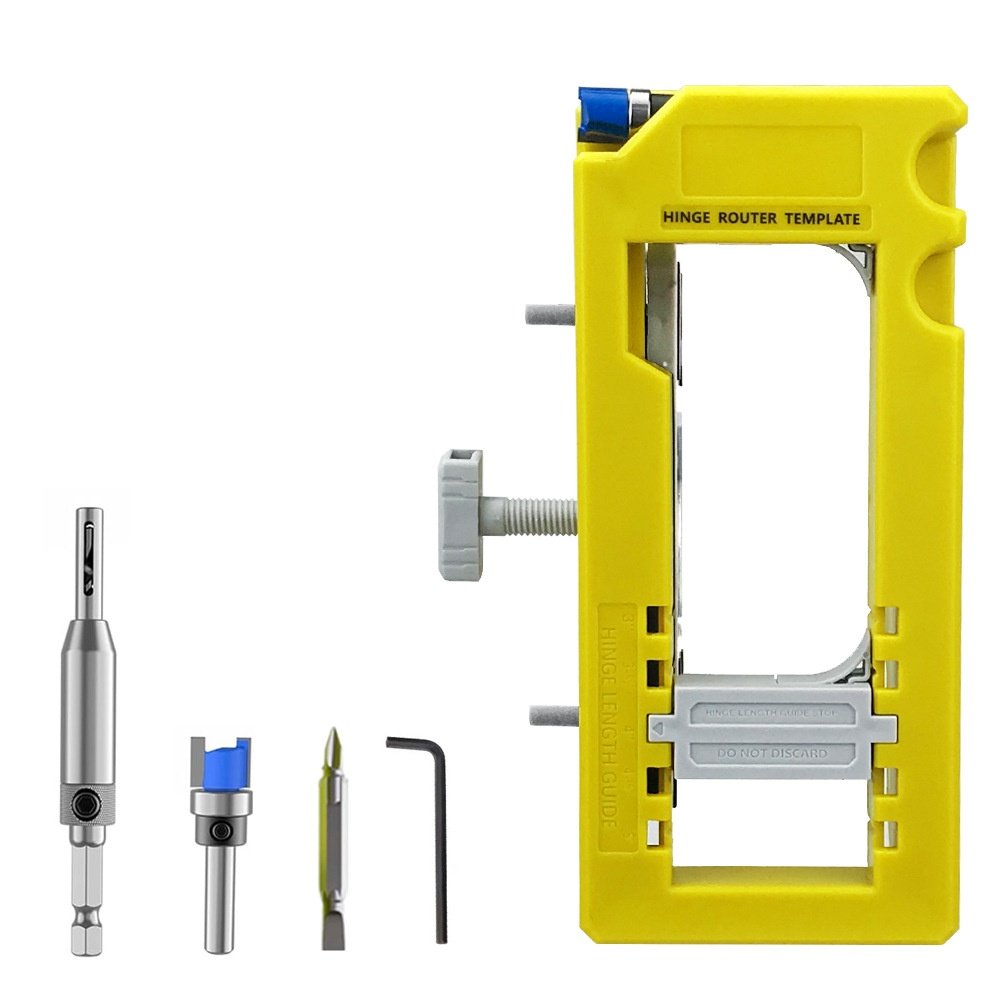
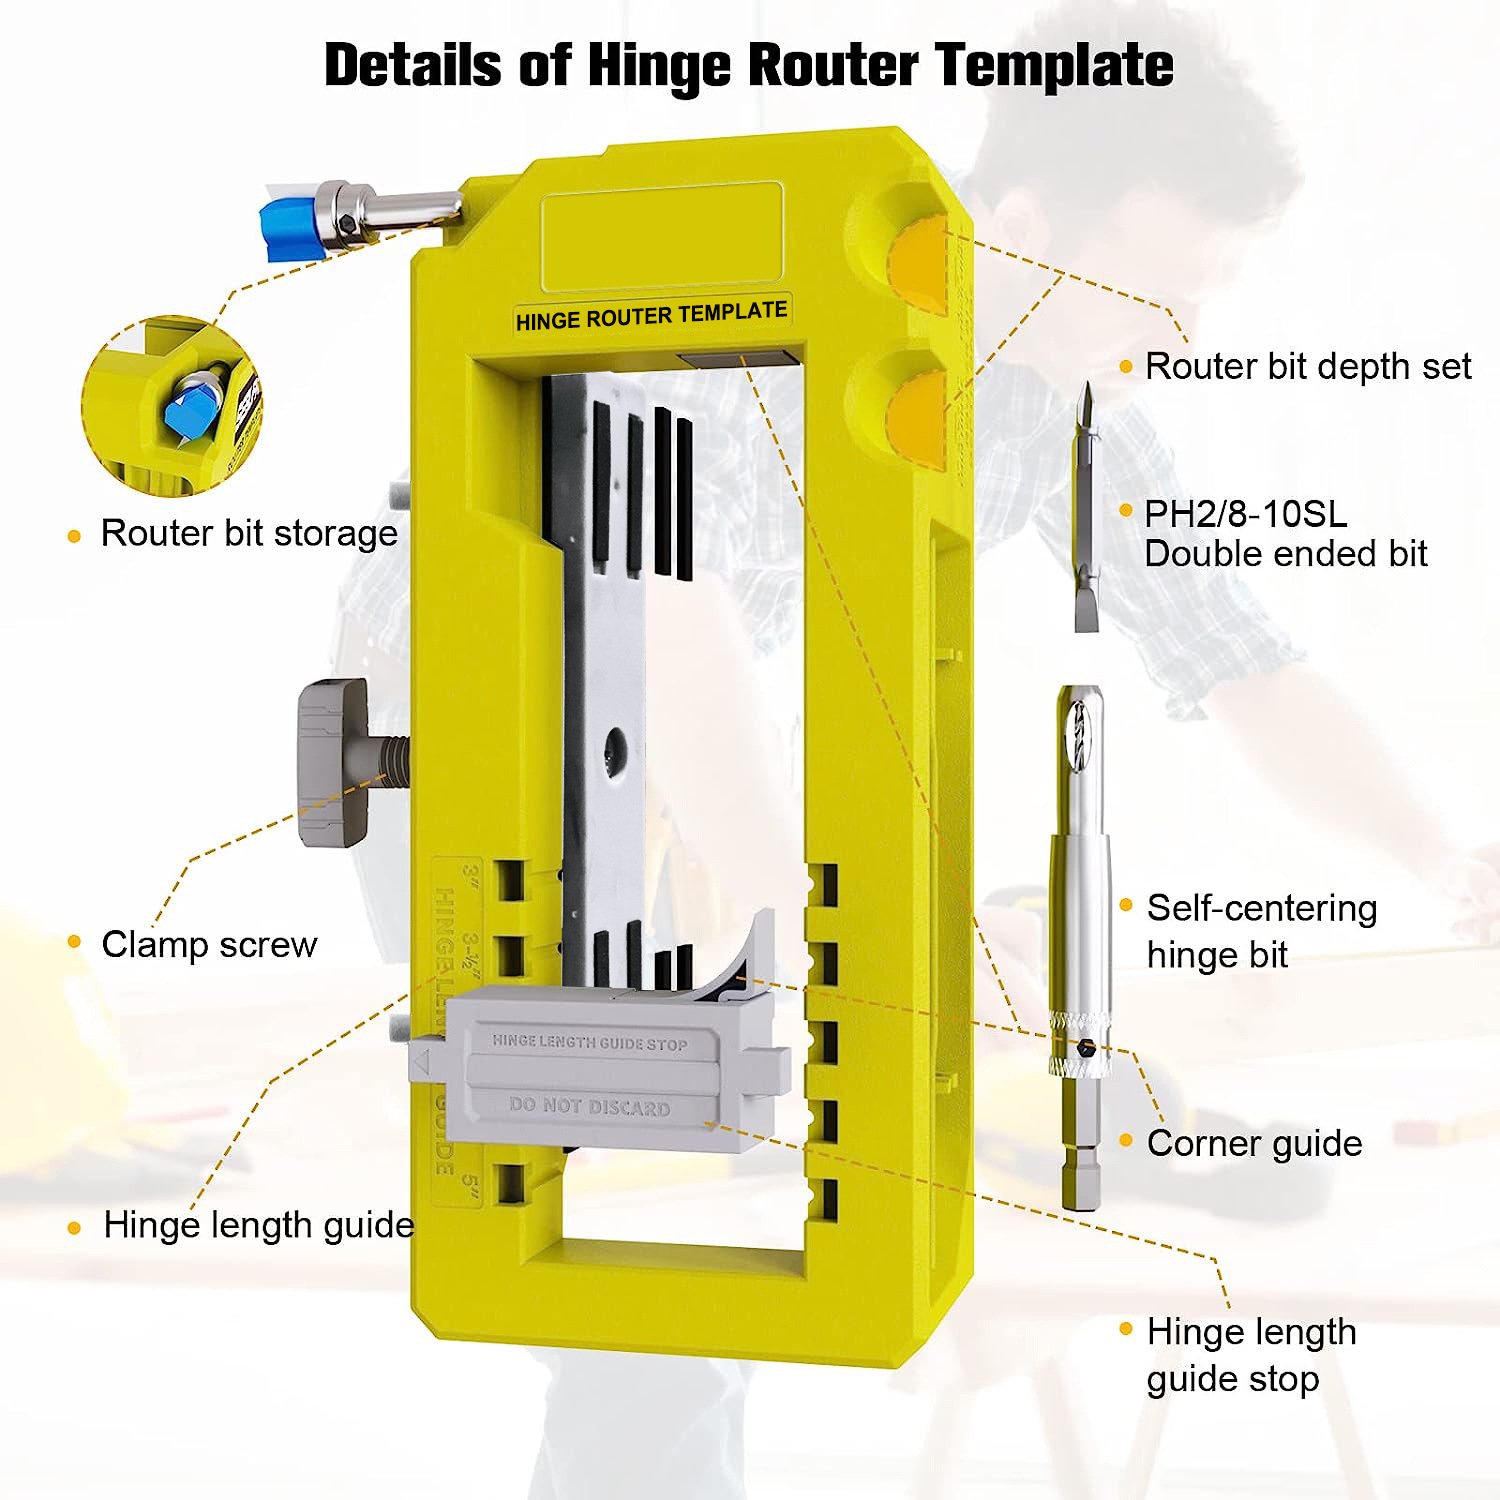
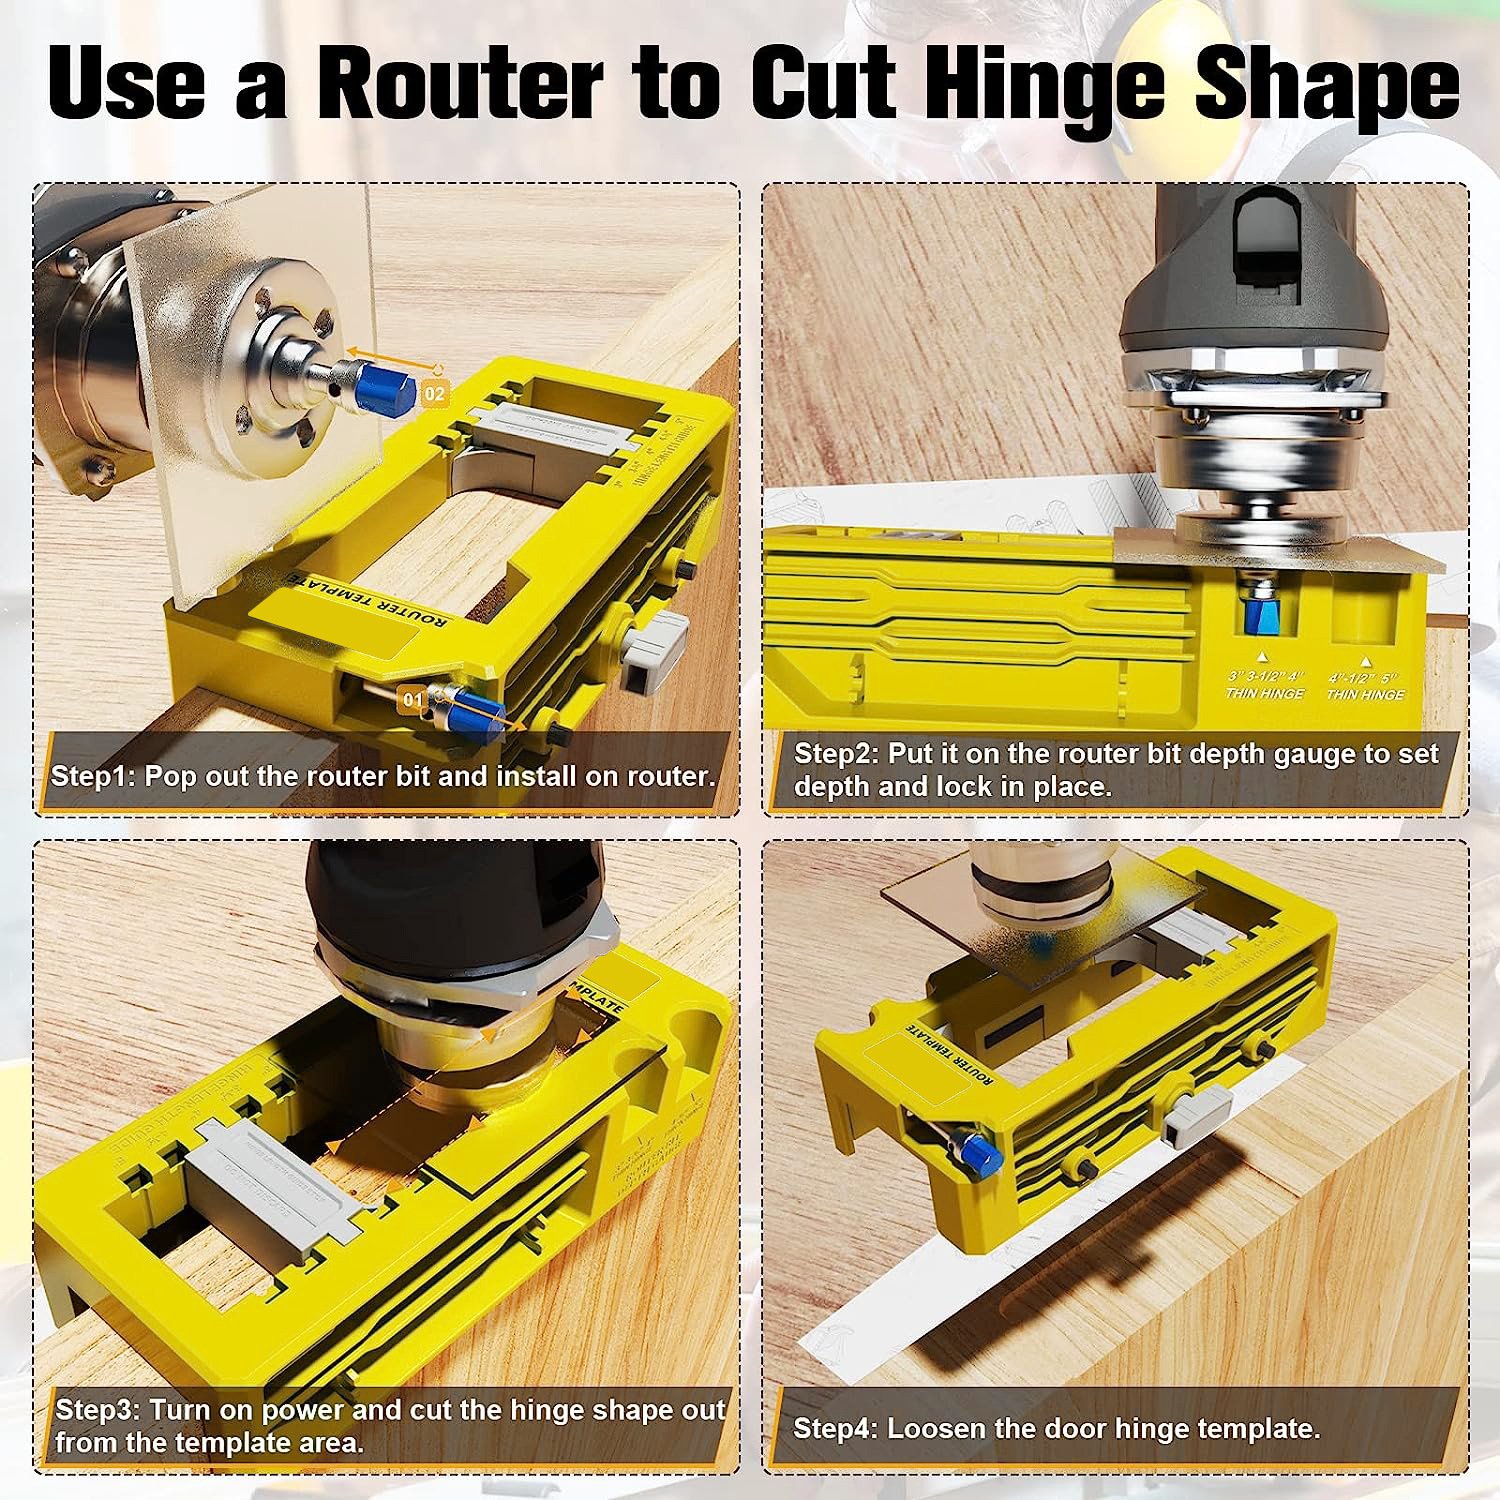
The Solution: The Hinge Router Template Kit
This door hinge jig eliminates the need for chisels, measuring, and guesswork. Here’s how it works:
Position the Jig
Place the hinge template against the door edge at the desired hinge location. The silicone pads grip the door surface, keeping the jig stable without screws or clamps.
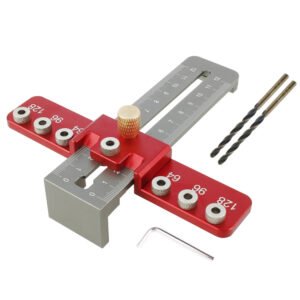
Set the Depth
Use the built-in depth gauge to set your router bit to the correct mortise depth. The gauge has markings for thin hinges (3″-4″) on the left and thick hinges (4½”-5″) on the right.
Route & Done
Run your router along the template opening. The guide bearing follows the template edge, cutting a perfect mortise. Remove the jig and install your hinge – it’s that simple.
Why Our Hinge Jig Is Different
We analyzed hundreds of user reviews for door hinge jigs on Amazon, eBay, and home improvement forums. Here’s what customers complain about most-and how our jig addresses those pain points.
| Common Complaint | Cheap Competitors | Our Solution |
|---|---|---|
| “Jig slides while routing” | Smooth plastic bottom, no grip | ✅ Silicone non-slip pads on both sides – stays put |
| “Doesn’t fit my hinge size” | Fixed template, one size only | ✅ Adjustable for 3″-5″ hinges with removable inserts |
| “Bits are cheap and dull quickly” | Unbranded bits, no quality control | ✅ Quality router bit with bearing guide, self-centering bit included |
| “Depth gauge is inaccurate” | Poorly molded markings | ✅ Clear, accurate depth markings for thin/thick hinges |
| “Only works on door, not jamb” | Most jigs are door-only | ✅ Designed for door edge mortising – follow our guide for jambs |
📌 Note: This jig is designed for door edge mortising only, not for door jambs [citation:8]. For jamb installation, use a self-centering hinge bit and measure carefully.
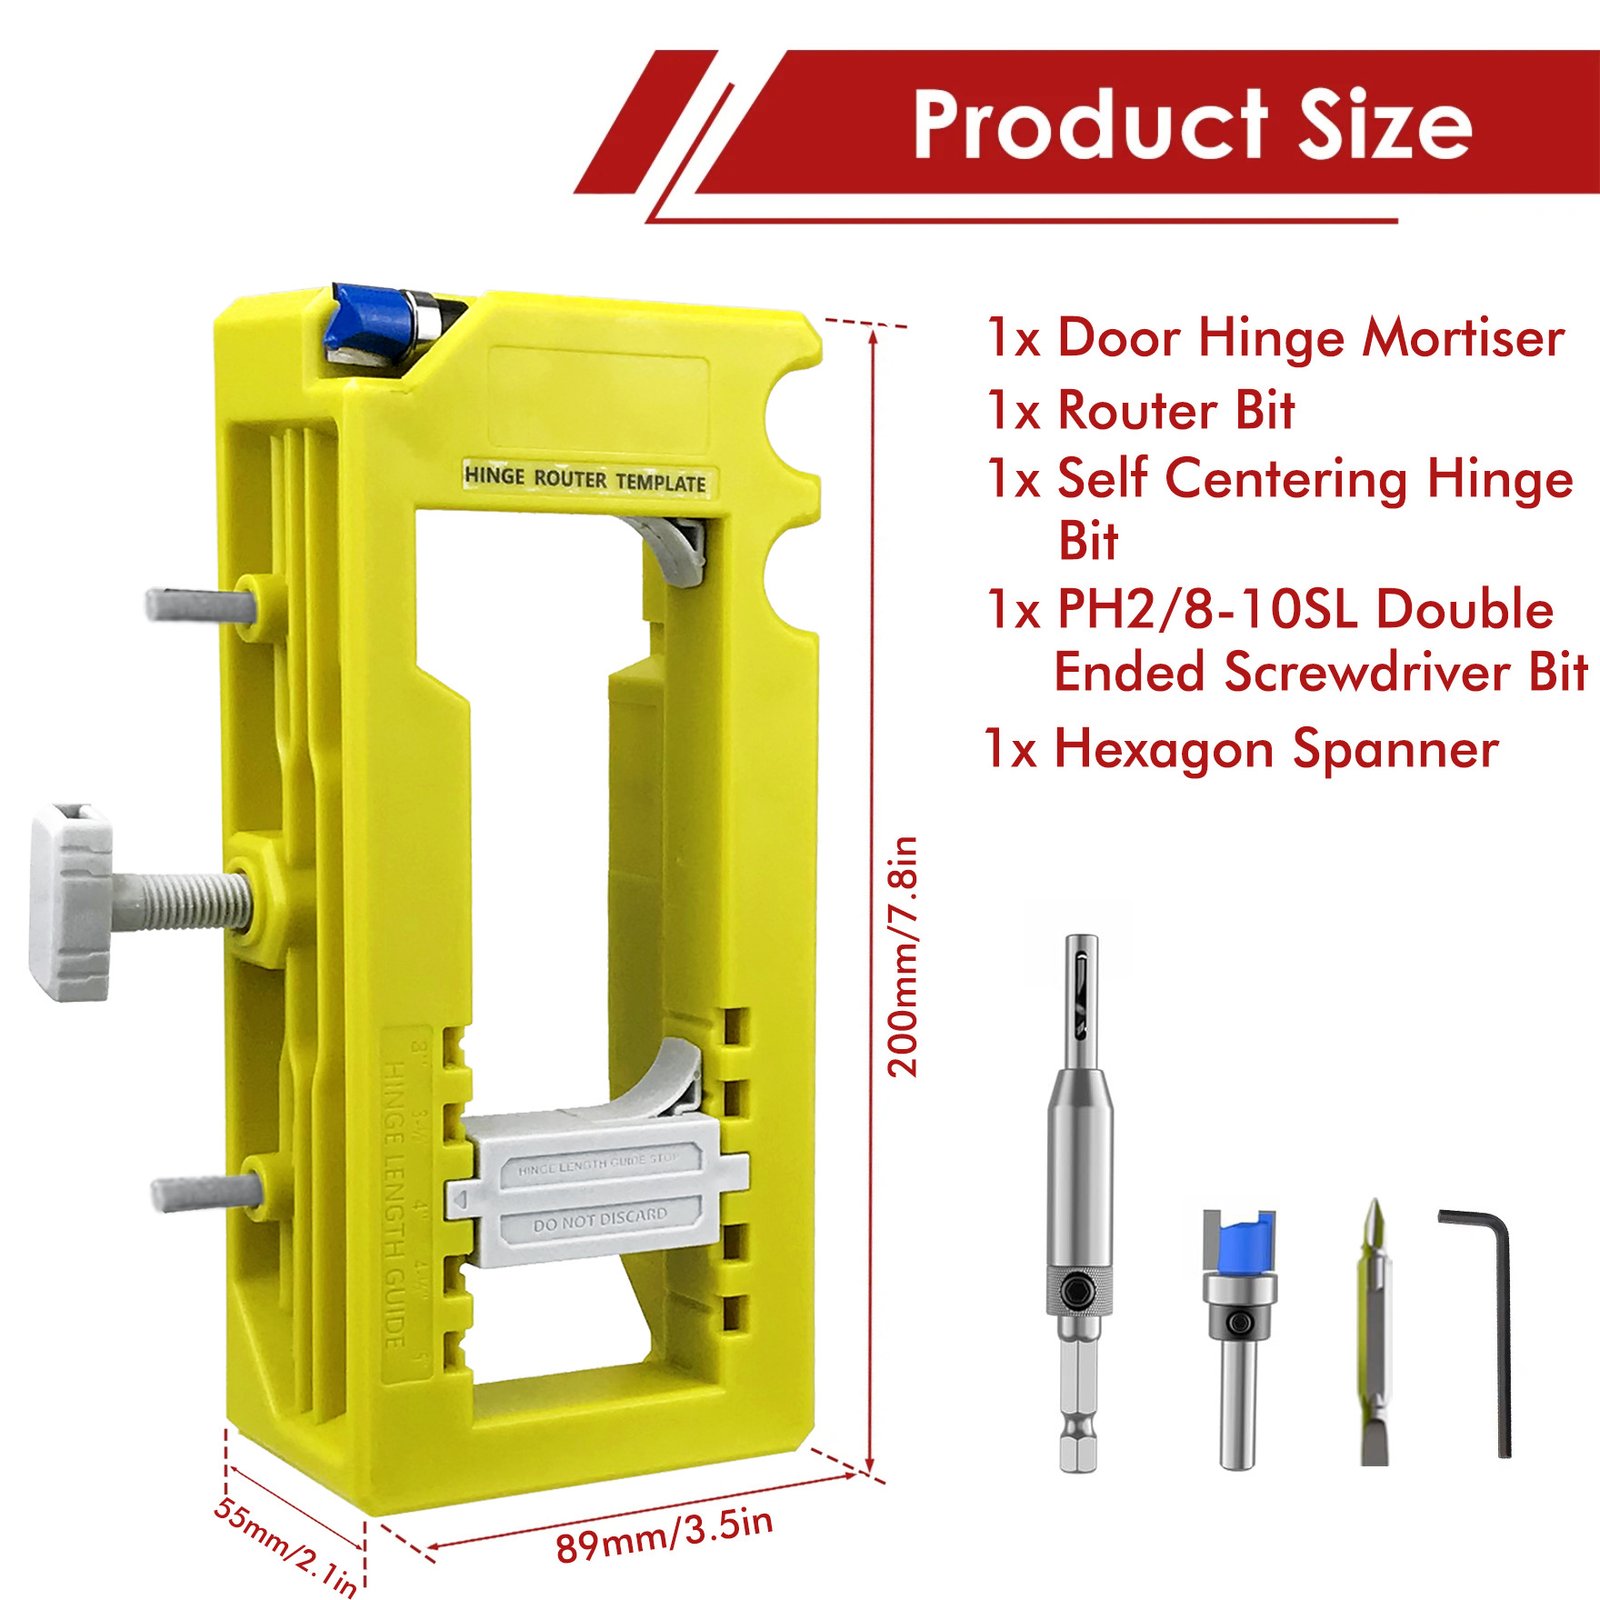
Technical Specifications
| Product Dimensions | 200 x 90 x 35 mm (7.9″ x 3.5″ x 1.4″) |
| Weight | 360g (12.7 oz) |
| Material | Impact-resistant ABS plastic + silicone pads |
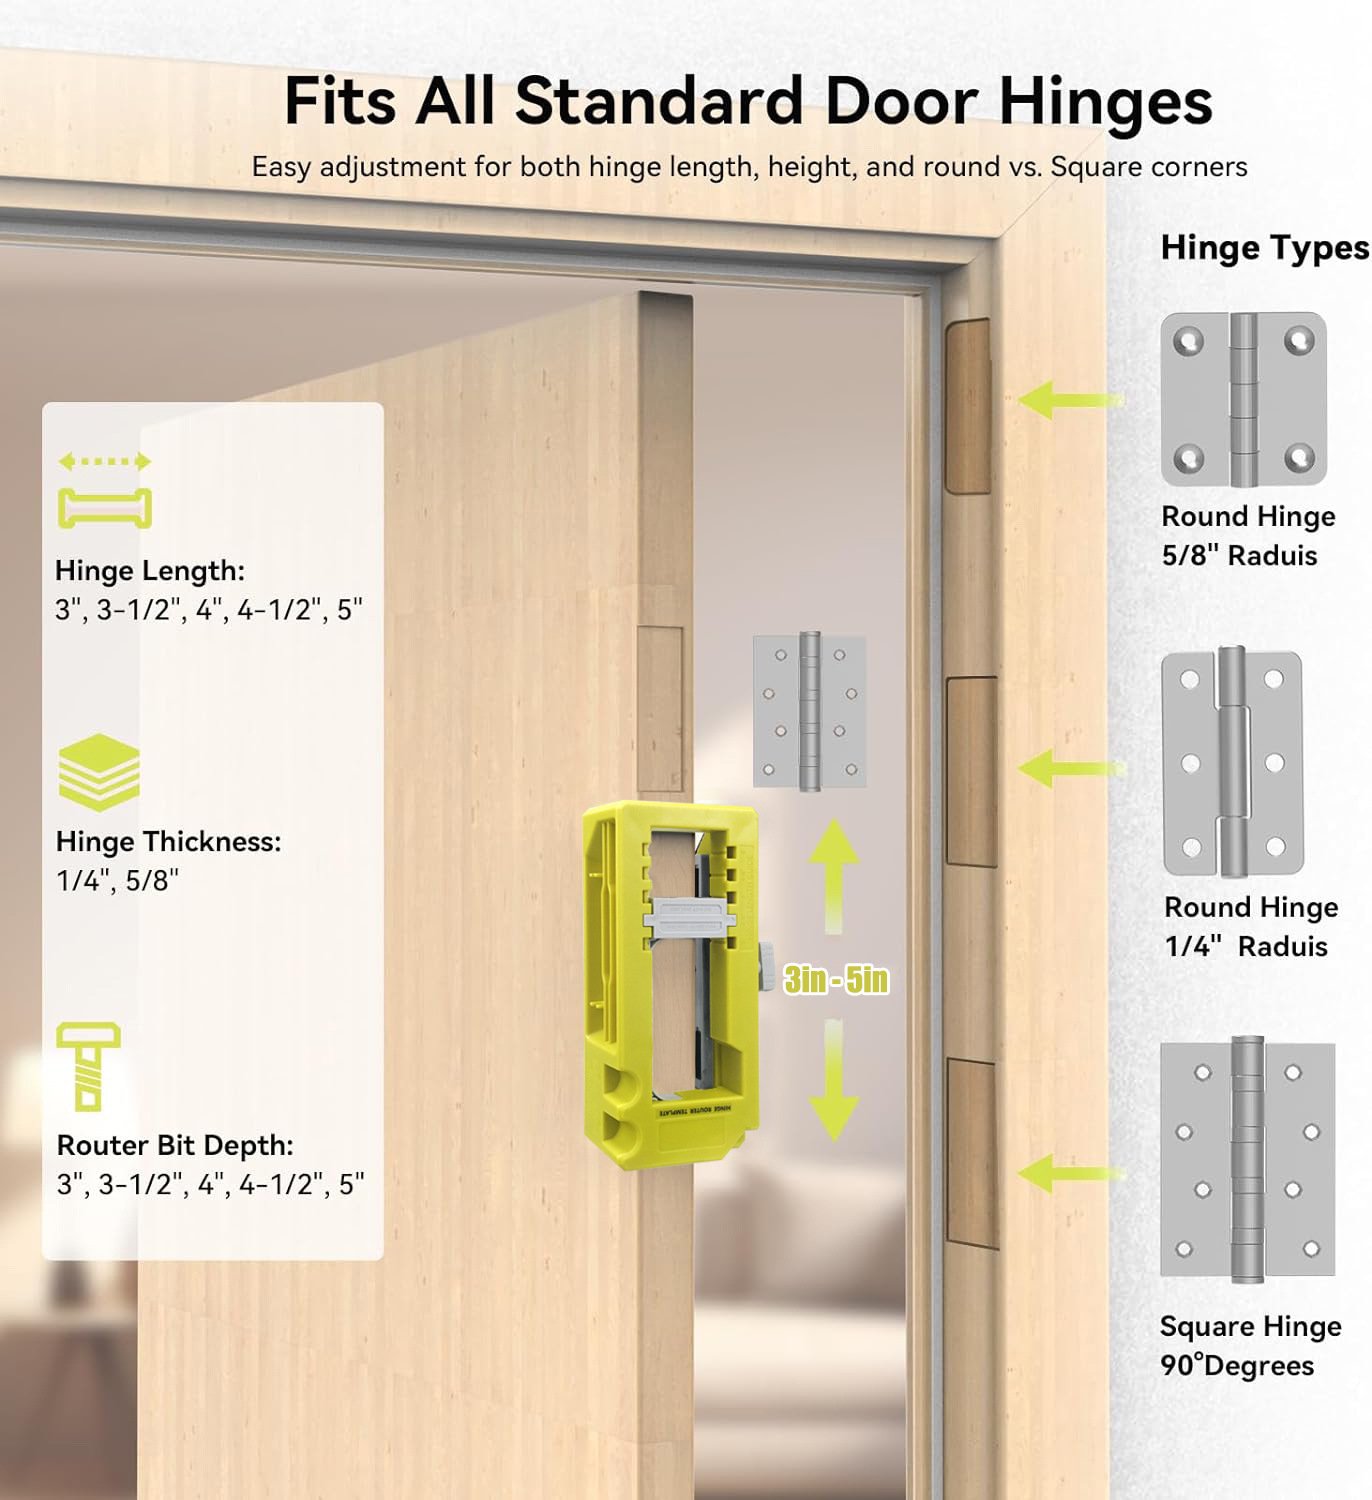
| Compatible Hinge Length | 3″ to 5″ (76mm to 127mm) |
| Compatible Corner Radii | 1/4″ (6.35mm) or 5/8″ (15.9mm) – round or square corners |
| Router Bit Diameter | 12mm with ball bearing guide |
| Included Bits | Router bit, self-centering hinge bit, PH2 screwdriver bit |
| Color | Yellow / Black |
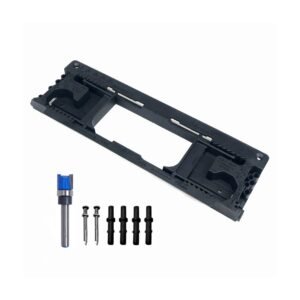
What’s in the Box
1x Door Hinge Jig Template
1x Router Bit (12mm with bearing)
1x Self-Centering Hinge Bit
1x PH2 Double-Ended Screwdriver Bit
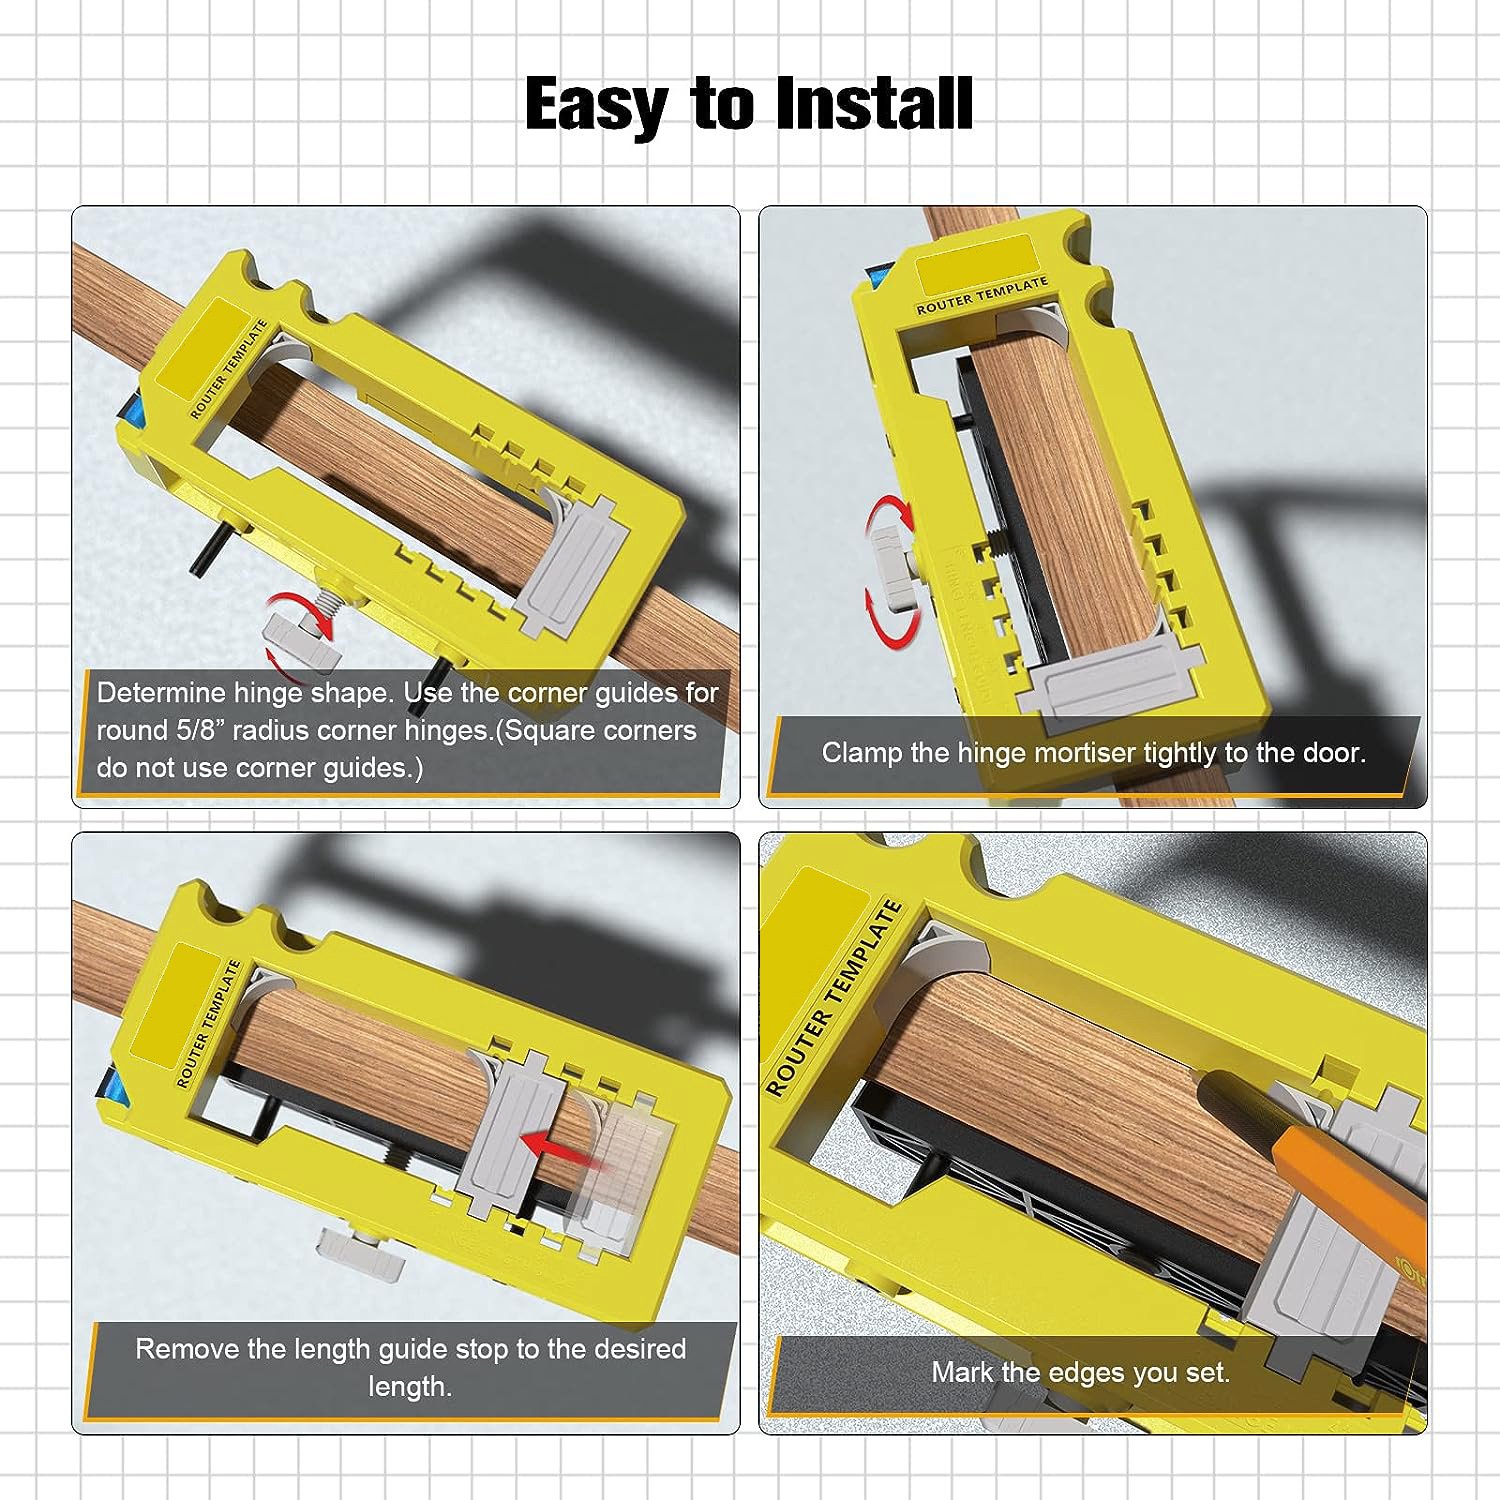
Step-by-Step Installation Guide
⚠️ IMPORTANT SAFETY NOTES: Always unplug your router before changing bits or making adjustments. Wear safety glasses and hearing protection. Follow your router manufacturer’s safety instructions [citation:2][citation:6].
Mark Hinge Positions
Measure and mark where each hinge will go on the door edge. Standard practice: 7″ from top, 11″ from bottom for interior doors.
Select Hinge Size
Choose the correct insert for your hinge length (3″, 3-1/2″, 4″, 4-1/2″, or 5″). Insert it into the jig body.
Position the Jig
Place the jig against the door edge at your marked position. The silicone pads will grip the door surface.
Set Router Depth
Use the built-in depth gauge. For thin hinges (3″, 3-1/2″, 4″) use the left side. For thick hinges (4-1/2″, 5″) use the right side.
Route the Mortise
Turn on the router, lower it into the template opening, and run along the inside edge. The bearing follows the template for a perfect cut.
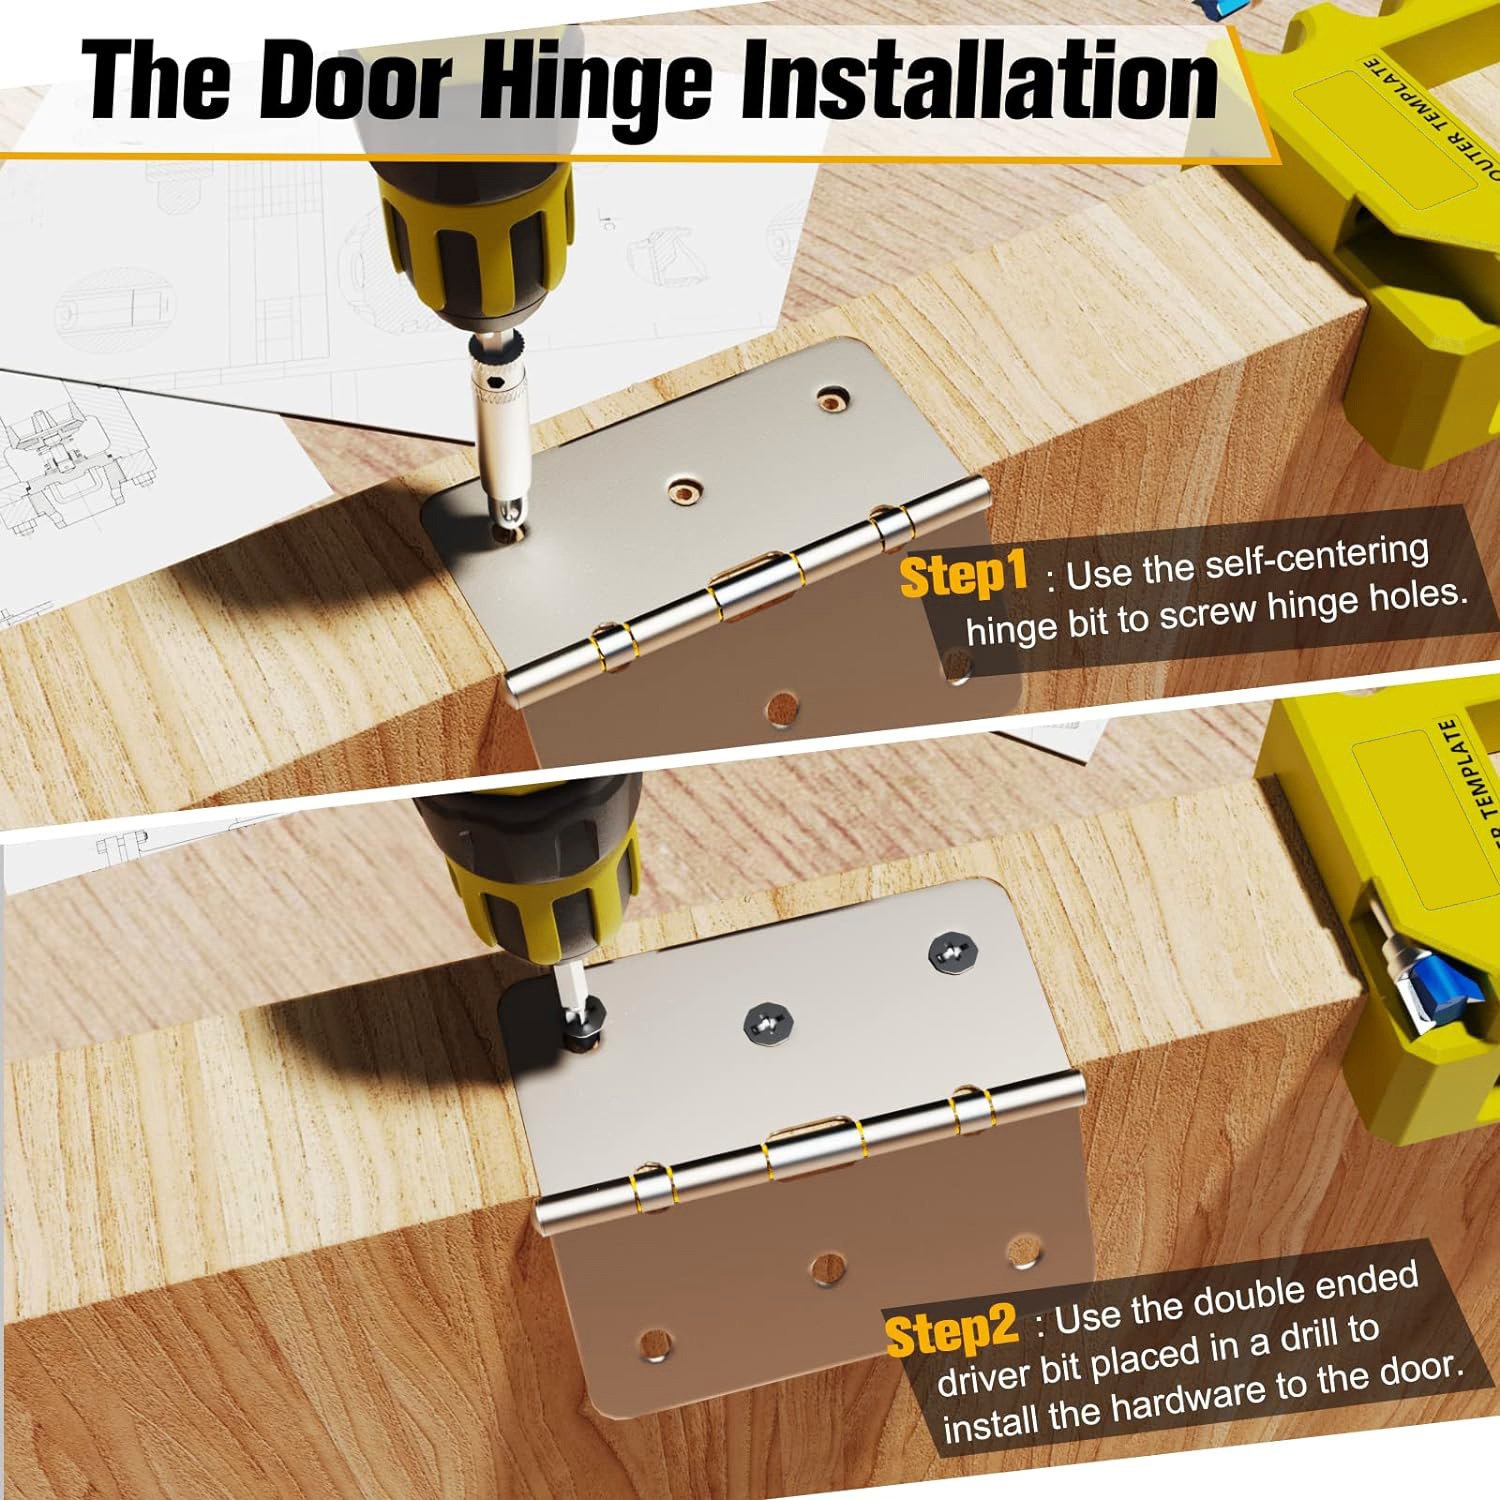
Clean & Install
Remove the jig. Use a utility knife to clear any loose fibers. Test-fit the hinge. It should sit flush. Install with screws using the self-centering bit.
Tech Q&A: Expert Answers to Your Questions
❓ Q: What hinge sizes does this jig work with?
A: This jig is compatible with hinges from 3″ to 5″ in length, including standard sizes: 3″, 3-1/2″, 4″, 4-1/2″, and 5″. It works with both round corner and square corner hinges with corner radii of 1/4″ or 5/8″ [citation:4].
❓ Q: Does this work on door jambs or only doors?
A: This jig is designed for door edge mortising only [citation:8]. For hinge mortises on the door jamb, use a self-centering hinge bit (included) and measure carefully. Professional jigs for jambs (like the Milescraft HingeJig) have a different design with self-clamping features [citation:3].
❓ Q: What’s the difference between this and the Milescraft HingeMate200?
A: The Milescraft HingeMate200 is a professional-grade steel jig that sells for $27.99 and includes 5 hinge templates [citation:2][citation:3][citation:6]. Our jig is a more affordable plastic alternative at $16.99 (40% less) that still includes all the essential features: adjustable hinge sizes, depth gauge, and all necessary bits. For DIYers and light professional use, our jig offers excellent value.
❓ Q: How do I set the correct mortise depth?
A: Use the built-in depth gauge on the side of the jig. For thin hinges (3″, 3-1/2″, 4″) use the left side marking. For thick hinges (4-1/2″, 5″) use the right side. Place your router on the gauge, lower the bit until it touches the bottom, then lock your router’s depth setting [citation:8].
❓ Q: Does this work with all routers?
A: The jig works with most trim routers and compact routers that use 1/4″ collets. The included router bit has a 1/4″ shank and 12mm cutting head with a ball bearing guide. For full-size routers, check that your router’s base plate fits within the template’s dimensions.
❓ Q: Will this work for square corner hinges?
A: Yes. The removable inserts work for both round and square corner hinges. For square corners, you will need to chisel the corners square after routing, as the router bit leaves rounded corners. The jig guides you to cut the correct outline, and a sharp chisel makes quick work of squaring the corners [citation:2][citation:6].
❓ Q: How many installations will the bits last for?
A: With proper use on wood doors, the router bit should last for 50+ hinge installations. The self-centering bit is designed for hundreds of screws. Keep bits clean and store them dry to maximize lifespan.
Important Notes & Tips
- Use a sharp router bit – A dull bit will burn the wood and create a rough mortise. Replace the bit if you notice burning or tear-out.
- Secure the door – Make sure the door is clamped or braced securely before routing. Movement during cutting will ruin the mortise.
- Test on scrap wood first – If you’re new to this tool, practice on a piece of scrap 2×4 to get a feel for the router speed and feed rate.
- Multiple passes for deep mortises – For hinges thicker than 1/4″, make two or three shallow passes instead of one deep pass. This reduces strain on the router and produces cleaner cuts.
- Keep the jig clean – Remove wood dust from the template opening and silicone pads after each use to maintain grip and accuracy.
- Don’t force the router – Let the router do the work. Forcing it can cause the bit to bind or the jig to shift.